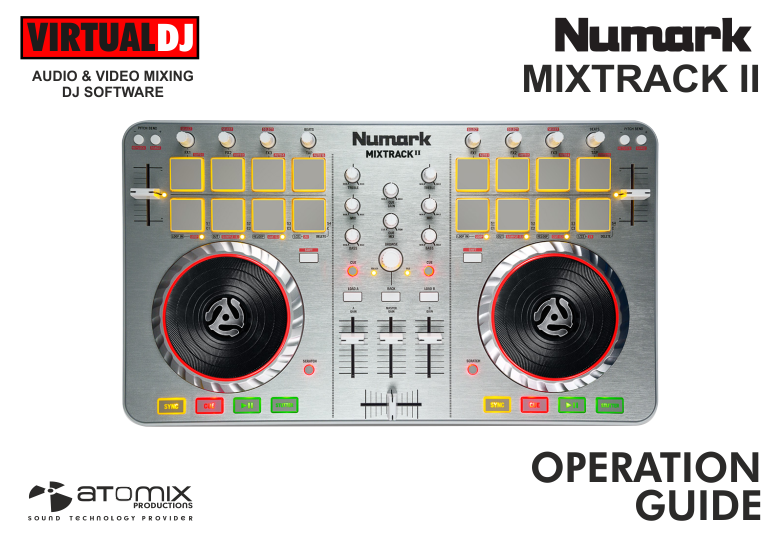
NUMARK MIXTRACK II
SETUP
Firmware & Drivers
No drivers are required to be installed and no firmware update is currently available. Mixtrack II is a USB Class compliant device, however always check the Numark website for any updated notifications
http://www.numark.com/product/mixtrack-ii
Simply connect the Mixtrack II USB socket (E) with a USB port of your computer and let your Operating system to install the necessary OS drivers.
VirtualDJ 8 Setup
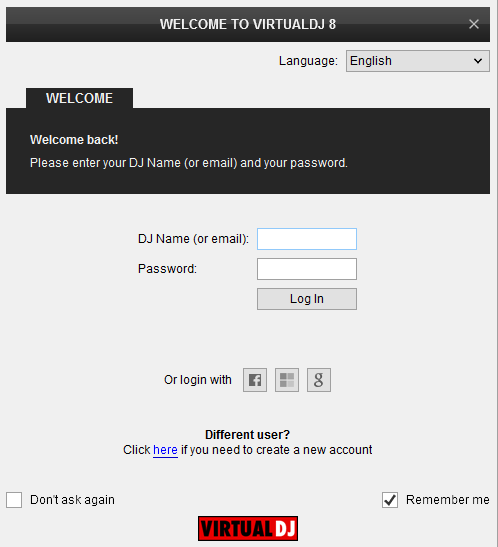
Once VirtualDJ 8 is opened, a Login Window will appear. Login with your virtualdj.com account.
A Pro Infinity, a PLUS Controller or a Subscription License is required to use the Numark Mixtrack II. Without any of the above Licenses, the controller will operate for 10 minutes each time you restart VirtualDJ 8.
http://www.virtualdj.com/buy/index.html
Click to OK.
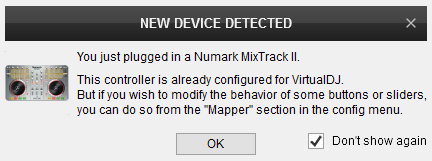
The unit is now ready to operate.
MIDI Operation
The unit should be visible in the CONTROLLERS tab of Config and the “factory default” available/selected from the Mappings drop-down list.
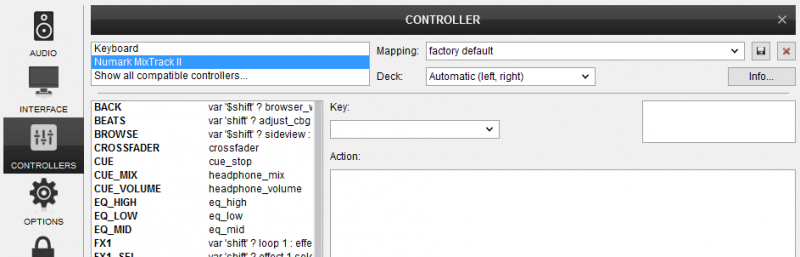
The factory default Mapping offers the functions described in this Manual, however those can be adjusted to your needs via VDJ Script actions.
Find more details at
http://www.virtualdj.com/wiki/VDJ8script.html
AUDIO Setup
The unit is not offering any pre-defined Audio configuration, as no built-in audio interface is offered. Depending on the sound card you need to use, manually create the necessary Master and Headphones audio configuration.
For further VirtualDJ settings and features please refer to the User Guide of VirtualDJ 8.
http://www.virtualdj.com/manuals/virtualdj8/index.html
LAYOUT
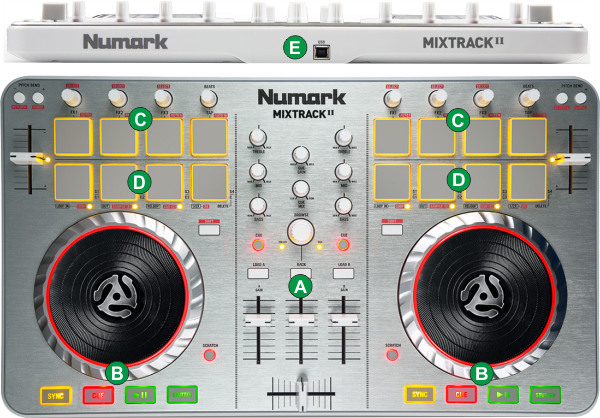
The functionality of each button and knob per section (as shown in the image above) will be explained in detail in the next chapters
A. Mixer & Browser Controls
B. Deck Controls
C. Effect Controls
D. Pads
MIXER & BROWSER CONTROLS
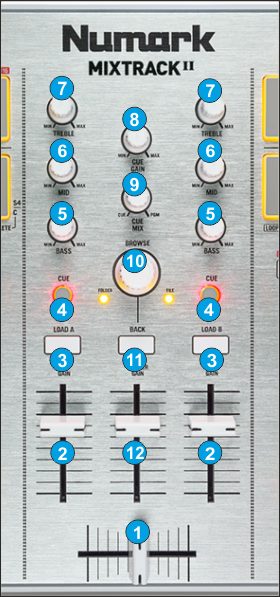
- CROSSFADER. Blends audio between the left and right channels.
- VOLUME. Channel Volume Faders
- LOAD. Press these buttons to load the selected track from Browser to the left or right deck. Hold SHIFT down and then use these buttons to unload the same deck.
- PFL/CUE. Press these buttons to send this channel's pre-fader signal to the Cue Channel for monitoring. When engaged, the button will be lit.
- EQ LOW. Adjusts the low (bass) frequencies of the corresponding software deck.
- EQ MID. Adjusts the middle (mid) frequencies of the corresponding software deck.
- EQ HI. Adjusts the high (treble) frequencies of the corresponding software deck.
- CUE GAIN. Adjusts the volume level of the headphone output.
- CUE MIX: Turn to mix between Cue and Master in the Headphone channel. When all the way to the left, only channels routed to Cue will be heard. When all the way to the right, only the Master Output will be heard.
- BROWSE. Use this encoder to scroll through files or folders depending on the focused Browser window. Hold SHIFT down and use the BROWSER encoder to cycle through the available views of the Sideview (Automix, Sidelist, Karaoke, Sampler and Clone-Shortcuts).
When focus is on the Folders list, push the Encoder to set the focus to the Songs Browser Window. If focus is on any other Browser window, push the encoder to load the selected track to the next available/free software deck. The Leds on the sides of the encoder will indicate which Browser Window is focused.
Hold SHIFT down and then push the encoder to open/close the SideView window of Browser. - BACK. Press this button to set focus to the next available Browser window. Hold SHIFT down and then press this button to open/close subfolders.
- MASTER GAIN: Adjusts the Master Output Volume
DECKS
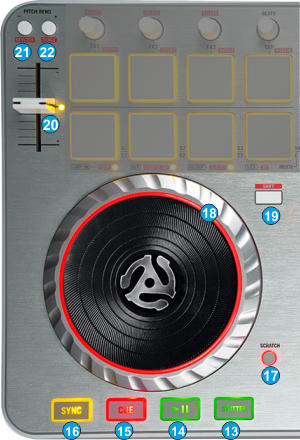
- STUTTER. Press this button to play-stutter the track from the last cued position.
- PLAY. Plays / Pauses the track.
- CUE. When the Deck is paused, you can set a Cue Point by moving the Platter to place the Audio Pointer at the desired location and then pressing the Cue Button.
During playback, you can press the Cue Button to return the track to this Cue Point. (If you did not set a Cue Point, then it will return to the beginning of the track.).
If the Deck is paused, you can press and hold the Cue Button to play the track from the Temporary Cue Point. Releasing the Cue Button will return the track to the temporary Cue Point and pause it. To continue playback without returning to the Temporary Cue Point, press and hold the Cue Button, then press and hold the Play Button, and then release both buttons.
- SYNC. Press this button to automatically match the corresponding Deck's tempo with the opposite Deck's (or the Master Deck’s if using a 4 decks Skin) tempo and phase. Hold SHIFT down and then press this button to set this deck as Master Deck.
- SCRATCH. Press this button to set the Jogwheel to Vinyl (Scratch) or CD (Bend) mode. In Vinyl mode, use the outer part of the Jogwheel to bend (temporary speed up – slow down the tempo of the track).
- JOG. Touch sensitive jogwheel. Use the jogwheel to scratch (if Vinyl mode is selected) or pitch bend. Hold SHIFT down and then use the jogwheel to fast seek through the track.
The Jogwheel also offers Loop In and Loop Out point adjustment (see Manual Loop Pads mode) - SHIFT. Press and hold this button to access secondary functions (mainly in orange lettering) of other controls on the Mixtrack II
- PITCH. Adjust the track's playback speed (tempo). The actual pitch fader will not alter the pitch of the track if the actual pitch and the software pitch value do not match (software soft-takeover, ghost fader visible on the GUI). In most cases this may happen if SYNC is used.
The Led right next to the pitch fader will be lit if the pitch is at the zero (middle position) and will blink if the values of the software and hardware pitch don’t match. - PITCHBEND-. Press and hold down this button to temporary slowdown the song while pressed. When released, the track playback will return to the speed designated by the Pitch Fader
Hold SHIFT down and then press this button to "lock" the track's pitch to its original key. The track's tempo will remain at the speed designated by the Pitch Fader. - PITCHBEND+. Press and hold down this button to temporary speed up the song while pressed. When released, the track playback will return to the speed designated by the Pitch Fader
Hold SHIFT down and then press this button to adjust the range of the Pitch Fader ( to ±6%, ±8%, ±10%, ±12%, ±20%, ±25%, ±33%, ±50%, and ±100%).
EFFECTS & UPPER PADS
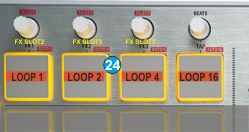
The upper 4 PADs (24) of the Mixtrack II offer multi-slot Effect controls and Quick Loops if SHIFT button is pressed.
Effects & Beats
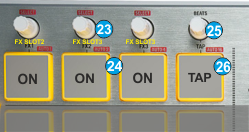
- FX ENC
FX1 Enc. Use this encoder to control the 1st parameter of the selected Effect on FX Slot 1. Hold SHIFT down and then use this knob to select the Effect on FX Slot 1.
FX2 Enc. Use this encoder to control the 1st parameter of the selected Effect on FX Slot 2. Hold SHIFT down and then use this knob to select the Effect on FX Slot 2.
FX3 Enc. Use this encoder to control the 1st parameter of the selected Effect on FX Slot 3. Hold SHIFT down and then use this knob to select the Effect on FX Slot 3.
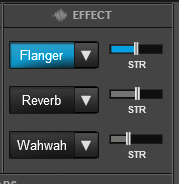
- FX ON
FX1 ON: Press this button to trigger the selected Effect on FX Slot 1.
FX2 ON: Press this button to trigger the selected Effect on FX Slot 2.
FX3 ON: Press this button to trigger the selected Effect on FX Slot 3. - BEATS. Use this encoder to move forward/backwards the track by 1 beat per step. Hold SHIFT down and then use the encoder to shift the CBG (Beatgrid) of the track forward/backwards by 1 beat per step.
- TAP. Press this PAD to manually tap the tempo of the track (if necessary). If the track is paused, one press of the button will move the First Beat to the current position. If the track is paying at least 4 taps (on the tempo) is required for the new tempo to be calculated.
Quick Loops
Press and hold SHIFT (19) down and then use the 4 upper PADs (24) to trigger a Loop of different beats size (1, 2, 4 and 16 beats) as per the image.
LOWER PADS
The lower 4 PADs (27) of the Mixtrack II offer Loop, Sampler and HotCues controls depending on the selected mode
Manual Loop mode
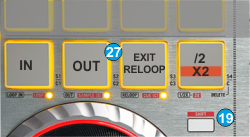 Hold SHIFT down and then press the 1st PAD from left to set the lower PADs to Manual Loop mode. The small orange led right below the 1st PAD will be lit to indicate the selected mode.
Press the 1st PAD to set a Loop In (Entry) point and then press the 2nd PAD to set the Loop Out (Exit) point and trigger a manual loop.
If a Loop is enabled press the 1st or 2nd PADs to set the Jogwheel to Loop In or Loop Out Adjust mode and then use the jogwheel to fine adjust the Entry and Exit points of the Loop. The Leds of the PADs will blink to indicate the selected mode.
Either press the same PADs or exit the Loop in order the jogwheel to return to the Jog mode.
Use the 3rd PAD to exit the Loop (if triggered) or trigger the last enabled Loop (re-loop).
Press the 4th PAD to half the size of the Loop or hold down SHIFT and then press the same PAD to double its size.
Sampler mode
 Hold SHIFT down and then press the 2nd PAD from left to set the lower PADs to Sampler mode. The small orange led right below the 2nd PAD will be lit to indicate the selected mode.
Each one of the 4 lower PADs (27) will trigger a Sample from the selected Bank of VirtualDJ. If the selected bank has less than 5 samples (slots), both sides of the Mixtrack II will control the same samples. If a bank has more than 4 samples (slots), the left side of the Mixtrack II will control samples 1 to 4 and the right side samples 5 to 8.
The Leds of the 4 PADs will be lit if a Sampler slot is loaded and will blink if the slot is playing.
Hold SHIFT down and then press the 4th PAD from left to select and load the next available Sampler Bank.
HotCues mode
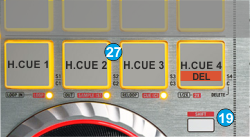 Hold SHIFT down and then press the 3rd PAD from left to set the lower PADs to HotCues mode. The small orange led right below the 3rd PAD will be lit to indicate the selected mode.
Each one of the 4 lower PADs (27) assigns a Hot Cue Point (1 to 4) or returns the track to that Hot Cue Point. When a Hot Cue Button is unlit, you can assign a Hot Cue Point by pressing it at the desired point in your track. Once it is assigned, the Hot Cue Button will light. To return to that Hot Cue Point, simply press it.
Hold SHIFT (18) down and then press the 4th PAD from left to enter the Delete HotCue mode. The Leds of the 4 Pads will blink (if a HotCue is assigned). Press the Pads to delete its assigned HotCue. Hold SHIFT and then press the 4th PAD to return to the HotCues mode.
